Ovaltine Solution
How It Works
This is a set of minipuzzles – five minipuzzles that resolve to a separate word and a minimeta.
The pamphlet contains a list of contents, which also provides an ordering scheme for the puzzles that's used in a few places:
- Make-your-own periscope (plus mirrors)
- This informational pamphlet
- Disguise mustache
- Invisible ink revealer light
- Spy ID card
- Secret code wheel
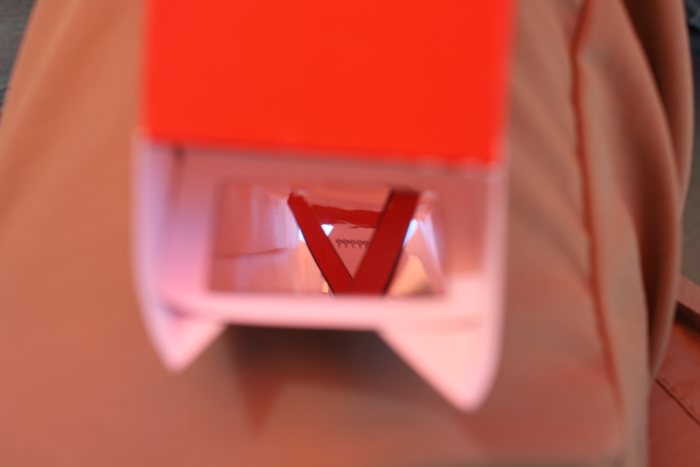
Periscope
This is a simple matter of following the instructions and building the periscope. A few tabs fold into the periscope proper and into a slot on the other side.
Once it's complete, looking in the end with an eye icon will reveal a downward-facing red triangle with a white interior, with five ?s on the inside. This is a YIELD sign.
Pamphlet
There are two copies of the pamphlet, but they aren't identical. (Both pamphlets are correct spelling/grammar-wise, so looking at one for errors won't notice anything unusual.) Each of the six numbered pages has a single discrepancy:
- Dive -> Delve
- Encode -> Encrypt
- Tell -> Talk to
- Alert -> Aware
- Informational -> Instructional
- List -> Listing
The two versions of each word start with the same letter; reading the initial letters by page number gives the answer DETAIL.
Mustache
The backing behind the mustache has three icons with blanks on it: _____ paper, turtle _____, candle _____
WAX is the word that fills in the blanks.
Revealer Light
This is a UV light with matching invisible ink pen. A few places on the other puzzles have letters written on them in invisible ink:
- IL on the periscope, on the portion that's cut out of the final product
- LU on the pamphlet, on one of the contents lists
- SO on the ID card, in the "paste photo here" box RY on the front of the code wheel.
Reading the letter pairs in the ordering scheme from the contents spells the answer, ILLUSORY.
ID Card
The top and bottom of the card are Morse, decoding to THE OTHER CODE THAT USES DOTS AND LINES. This is PIGPEN.
Code Wheel (Meta)
The code wheel is the one component of the puzzle that comes preassembled, hinting that the teams will have to take it apart. Printed on the back of the top sheet is a coded message: XEKWXE IAD YQOMJ RHWSOY XLBGV. The first step is to decode this message using the wheel, but there are two tricks. The first is that the instructions in the pamphlet are how to encode the message, so you have to reverse the process to get the decode. (turn the wheel until the coded letter appears in the window, then see which letter the arrow's pointing to) The second is that there are five rings- with trial and error, teams should figure out that they use the outer ring for the first word, the second ring for the second, etc. This resolves to DECODE THE OTHER ANSWER WORDS.
This is the meta, so the next step is to decode the five answer words from the other puzzles in the order provided by the pamphlet, using the same process. The answers decode to AGENT EIGHTY SIX FOOTWEAR GADGET, referring to Maxwell Smart's SHOE PHONE.
Solution
SHOE PHONE
Design Notes
This was the first of my puzzles whose name was movie-related: I considered making the title something else and the answer "Be sure to drink your Ovaltine." But I liked the Get Smart reference, since the series fits the theme.
The "tell two adults" bit in the pamphlets is a bit of flavor to start hinting at the Red Scare theming of the other side. It's loosely based on a sequence from a similar science fiction short story, Will You Be An Astronaut.
Construction Notes
The mustache images were pretty inconsistent – we switched to a much cheaper mustache shortly before the Game, and the sharpied images didn't work as well as it had before.
GC Notes
The mustaches got a lot of use over the course of the weekend – teams sent us photos of them wearing the mustaches, putting mustaches on their bricks, etc. The answer submission app gave a Muy Guapo! achievement for any such acts of creativity.
Images courtesy of Team Teal-A