Bows Solution
How It Works
The full guide is available in .pdf format. It includes the construction guide and handout.
Download it here.
Step 1
Teams should immediately notice that their bow is a star chart that has been cut into ribbons. There are 12 strips that can be assembled in a straightforward way using the orientation of the text and the outline of the 2 hemispheres. They should disassemble the bow and reconstruct the "Map of the Sky" poster.
Step 2
NOTE: The flavor text tries to imply that this step should occur first, but teams may work slightly out of order. That�s okay.
Teams should read the enclosed handout. They should notice the "Near __h" at the start of each line on 2 pages of their handout. Upon inspecting the star chart, they will hopefully notice that these indicate the small hour markers that are found on the edge of each hemisphere. These numbers are printed on the map as "1h", "2h", "3h", etc. through "0h/24h". As a note, these numbers are indicating the "right ascension" of the galactic coordinate system (using the right hand rule), sometimes measured in hours and minutes. This terminology is not needed for the puzzle, but could be used to help explain to a team that has been using the internet for searching.
Once teams have gotten where to find the "__h" numbers, they can start filling these out. Two copies of the handout are provided to help parallelize this process.
To find the appropriate number to fill in the blank, teams are supposed to find the celestial object specified, then find whatever ascension line is closest to the object. For example, a star that is closest to the 4h line should be "4", whether it is on the right or the left of the line.
NOTE: Even though a star may be closest to 4h, it is possible for teams to read a location as "3h 50m" and truncate this to "3h" instead of noting that it is closest to "4h" as intended. This is something that could cause noise in their data for step 3.
Step 3
This is the first leap. From numbers between 1 h and 0/24 h, teams need to realize that those are letters between A=1 and X=24. (Note: The letter X is not used, so teams will not need to decide what 0/24 means.)
Once the numbers are converted into letters, the following can be used for data confirmation:
Solves to: DRAWTOURSTHENARRANGEMAPSTRIPNUMBERS 11 7 5 12
NOTE: The final 4 numbers should be interpreted as NUMBERS, not letters. As letters, these are KGEL. The phrase hints numbers explicitly, but this can be a catching point for some teams.
Near 4 h, 'Atik' in PERSEUS
Near 18 h, 'Sargas' in SCORPIUS
Near 1 h, 'Deneb Kaitos' in CETUS
Near 23 h, 'Markab' in PEGASUS
Near 20 h, 'Altair' in SAGITTA
Near 15 h, 'Kochab' in URSA MINOR
Near 21 h, 'Alderamin' in CEPHEUS
Near 18 h, The Eagle Nebula in the vicinity of SERPENS CAUDA
Near 19 h, 'Vega' in the vicinity of LYRA
Near 20 h, 'Sadr' in the vicinity of CYGNUS
Near 8 h, 'Avior' in CARINA
Near 5 h, 'Hassaleh' in AURIGA
Near 14 h, 'Alkaid' in URSA MAJOR
Near 1 h, 'Mirach' in the vicinity of ANDROMEDA
Near 18 h, 'Kaus Australis' in SAGITTARIUS
Near 18 h, 'Eltanin' in DRACO
Near 1 h, The Small Magellanic Cloud in the vicinity of TUCANA
Near 14 h, 'Menkent' in CENTAURUS
Near 7 h, 'Sirius' in CANIS MAJOR
Near 5 h, 'Almaaz' in AURIGA
Near 13 h, 'Alioth' in URSA MAJOR
Near 1 h, South Galatic Pole
Near 16 h, 'Acrab' in SCORPIUS
Near 19 h, 'Ascella' in SAGITTARIUS
Near 20 h, 'Dabih' in CAPRICORNUS
Near 18 h, The Lagoon Nebula in the vicinity of SAGITTARIUS
Near 9 h, 'Alsuhail' in VELA
Near 16 h, 'Unukalhai' in SERPENS CAPUT
Near 14 h, 'Arcturus' near BO��TES
Near 21 h, 'Gienah' in CYGNUS
Near 13 h, 'Cor Caroli' in CANES VENATICI
Near 2 h, 'Hamal' in ARIES
Near 5 h, 'Capella' in AURIGA
Near 18 h, 'Shaula' in SCORPIUS
Near 19 h, 'Nunki' in SAGITTARIUS
Near 11 h, 'Dubhe' in URSA MAJOR
Near 7 h, 'Adhara' in CANIS MAJOR
Near 5 h, 'Rigel' in ORION
Near 12 h, 'Minkar' in CORVUS
Step 4
NOTE: It is possible/likely that teams may do this in advance of steps 2 and 3 because 2 markers are included with their puzzle. This implies that they will need to draw on the map.
Teams will notice that there are "Tours" grouped into sets of 2-4 destinations. The partial solution to Step 3 will give them "DRAW TOURS".
Teams are then intended to start at the first destination in a "tour", and draw a straight line to each subsequent destination in that "tour" in the order given. This will result in several crisscrossing line segments by the time all tours are drawn.
NOTE: Each tour should not be connected to its preceding or subsequent tours. The tour should include n-1 connected straight lines for a tour with n destinations. Tours do not loop back to the beginning after the final destination, so there is a distinct start and end.
Step 5
The full solution to Step 3 has given teams DRAW TOURS THEN ARRANGE MAP STRIP NUMBERS 11 7 5 12. After drawing "tours" from the handout, teams are intended to number the map strips from 1 to 12, top to bottom. Then they should disassemble/remove strips 11, 7, 5, and 12, and place them in that order.
Strips 11 and 12 of the map are on a black background, while most of the poster is on a dark blue background. These strips are intended as a frame. The contents of these strips show the Zodiac.
Strips 7 and 5 contain line segments from the drawing of the tours. When you view these strips together in this orientation, the word "TWINS" is spelled out from these line segments. This should be a partial answer that hints there�s one last short jump.
NOTE: It�s possible for teams to worry they�ve done the wrong thing, since strips 11 and 12 are not used in the first part of this puzzle. It is also possible for teams to skip them, since they did not draw on them, and only look at strips 7 and 5. It should still be possible to solve the puzzle without these, since they are only used for hinting.
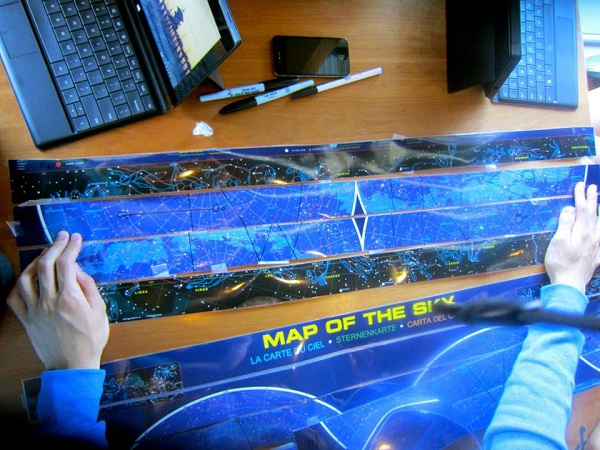
Photo used with permission from Johnny Lee Othon on team Reddish-Orangeish.
Step 6
Final short step: The constellation known as the twins is "GEMINI" (Solution). This is strongly hinted by the use of constellations throughout the puzzle, as well as the Zodiac frame of strips 11 and 12. The Zodiac portion of the star chart has the common drawings of each constellation, in addition to the outline that is generally unrecognizable. The GEMINI constellation happens to fall in the center of these strips as well, so the answer is right there when they read "TWINS".
Solution
GEMINI
Design Notes
Handout Description
In the handout, there are 4 pages.
2 pages are a list of "exciting destinations". These are formatted like this:
Near __h, 'Atik' in PERSEUS
Each destination has "Near __h" at the start of the line.
Each destination has a location. These locations are named stars or nebula that are called out on the star chart they have been given.
2 pages are lists of "Tours". There is one page for "Northern Tours" and one page of "Southern Tours". These are formatted like this:
4
'Polaris' in The Little Dipper
'Regulus' in LEO
'El Nath' in TAURUSEach "Tour" is a set of 2-4 destinations. Each destination is specified with 'directions' that allow it to be found based on the set of constellations and keys on the star chart they have been given. Please see "Handout Language" for a full description of these 'directions'.
"Southern" and "Northern" tours take place in their respective hemispheres, with no overlap/crossing between them. This helps facilitate parallelization, without having to get in each other�s ways.
Handout Language
- All constellations are listed in all capital letters.
- Other major celestial objects are listed in the casing given on the star chart that they are given.
- The term "in" is used to mean "this star is used as part of the constellation".
- The phrase "in the vicinity of" is used to mean something like "this location falls within the dotted line boundary that indicates the section of sky designated to this constellation". On their star chart, the map is divided into irregular sections by dotted lines. Generally one constellation per area. Ambiguities here have been avoided where possible. The goal is that teams can find the item.
- The terms "North Galatic Pole" and "South Galatic Pole" are intentionally spelled "Galatic" instead of "Galactic". The key on the star chart lists these terms, as spelled here, and abbreviations "NGP" and "SGP" for what appears on the map. Note: These locations are NOT the centers of the two hemispheres. They are marked with yellow crosshairs and the appropriate abbreviations.
- The terms "Type F" and "Type O/B" refer to a key on the left side of the star chart that gives each star a letter classification and color based on its temperature. For example, a type O/B star is indicated with a Blue color on the star chart.
- The terms "coldest star" or "hottest star" refers to the same key as above. Stars are given a color based on their temperature ranges. The hottest stars are blue, the coldest stars are red.
- The term "Magnitude 3 star" refers to a separate key on the right side of the star chart. This key gives a number for the brightness of the star. Brighter stars are represented with sun shapes and stars on the map. Dimmer stars are represented with small circles.
- Globular Clusters, Open Clusters, and Nebulae all have appropriate symbols indicated in the key on the star chart.
Construction Notes
Download the full construction guide.
Very generally:
This poster cut into 12 strips and formed into a bow using a variation of this tutorial. I taped it to the top of this box.